AWS custom-crafted load balancer with haproxy
Today’s tip is on how to launch a custom-crafted load balancer on AWS as a replacement for ELBs.
Motivation
First of all I need to say that I love AWS’ ELB. It is cost-effective and works just fine for most of the cases.
So why would I create a custom-crafted ELB? Well, there are some features that AWS’ ELB just don’t support. Things like:
- A static IP or elastic IP entry point
- UDP load balancing
- Customized balancing strategy
- Custom backend routing
- One load balancer for multiple backends
- SNI resolution(SSL routing)
So if the ELB is not suited for your use case, do it yourself :-)
Solution overview
This load balancer solution needs to be scalable, so we’ll be using an autoscaling group to add/remove instances as needed. For this to work properly, the autoscaling group needs to have lifecycle hooks to update route53 in the event of an scaling up/down. What we’ll need:
- 1 autoscaling group
- 1 lambda function
- 1 SNS Topic
- 2 lifecycle hooks
- 2 IAM roles with their respective policies
- 1 Route 53 domain
- Infrastructure automation code written in ansible
Here’s a diagram of how the pieces will interact with each other:
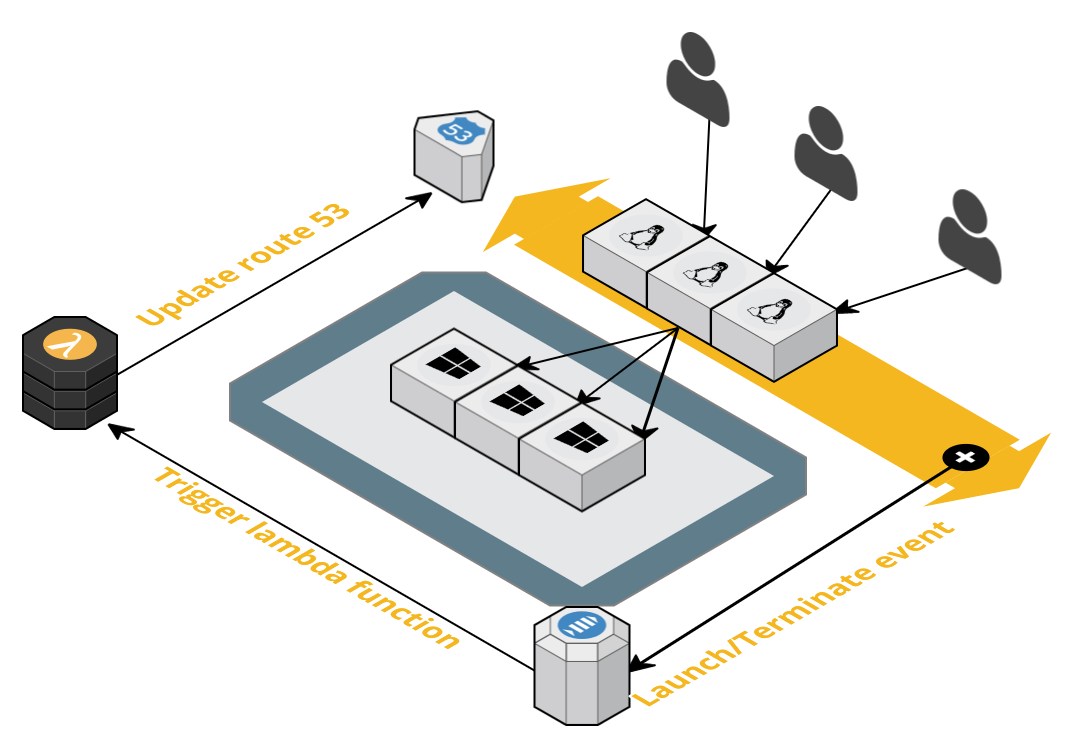
Once an ASG lifecycle event is triggered, a SNS message will be sent which in turn will execute the lambda function. The lambda function then:
- Adds (or removes) a route53 health check for the newly launched (or terminated) host
- Create a weighted record on route53 associating it to that health check
Getting started
So, let’s get started. First of all, you’ll need to get ansible. By the time I’m writing this, ansible’s
lambda module isn’t yet merged to the “stable” relase of ansible. So you’ll need to manually add that module. To make
this easier, I’ve packaged ansible with the lambda module. Just download it from here
and install using python setup.py install ( preferably on a python virtualenv )
1. Clone the aws-load-balancer repository
Most of the magic is handled by ansible so lets get that code:
git clone https://github.com/filipenf/aws-load-balancer.git
2. Edit the my-lb configuration file
Inside the aws-load-balancer directory, there’s a vars/my-lb.yml file defining some variables. You’ll need to edit that
file and change some of them. Namely:
domain_name- the top-level domain name that will be used ( i.e: example.com )auto_register_domain- FQDN that will be updated upon ASG’s lifecycle hooks ( instances being created/deleted from the group )subnets- the subnets that the loadbalancers will live onlb_mappings- the mapping between your domain names and backend instances
3. Execute the launch playbook
Now you’re all set to execute the launch playbook which will create the necessary AWS resources for our load balancer to work.
ansible-playbook -i localhost, launch-lb.yml \
    -e server_config=mylb \
    -e aws_account_id=<your_aws_account_id> \
    -e key_name=<some_key>
If everything went well, you should have a new ASG with one instance. That instance will already have haproxy properly
configured for the domains specified in the lb_mappings variable.
This playbook will also create the lambda function, SNS topic, lifecycle hooks and IAM roles needed for it to work.
The haproxy configuration is set to use sticky sessions and to synchronize the sticky-table with other ASG members. Additionally to that there’s a script called “update-peers” that will detect changes to the autoscaling group and updated the peers configuration accordingly.
Route53
If you check your Route53 hosted zone, by now you should already have one additional record. Here’s how mine looks like:
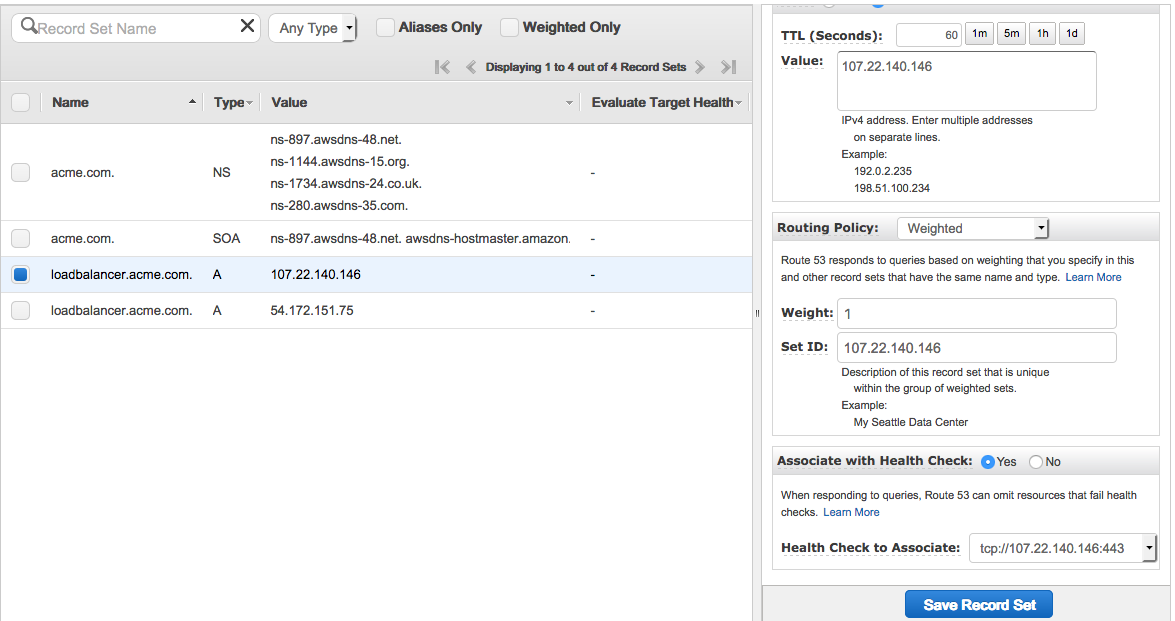
Note that the record has a health-check associated with it. The health check was also created by the lambda function and it is useful to avoid anouncing an instance that hasn’t finished its deployment process yet. The lambda function will also delete the health check and record set entries once some instance is removed from the auto scaling group.
Now that you have your loadbalancer.<domain.com> you need to point the other records to this one. For example, create a CNAME pointing
webmail.<domain.com> to loadbalancer.<domain.com> so when users hit webmail.<domain.com> they will connect to haproxy which
will reverse-proxy the connection to the appropriate backend.
Summary
This solution works great and it is very simple to implement. Hope this may help other people with similar needs.
Let me know what you think of this article on twitter @filipenf or leave a comment below!